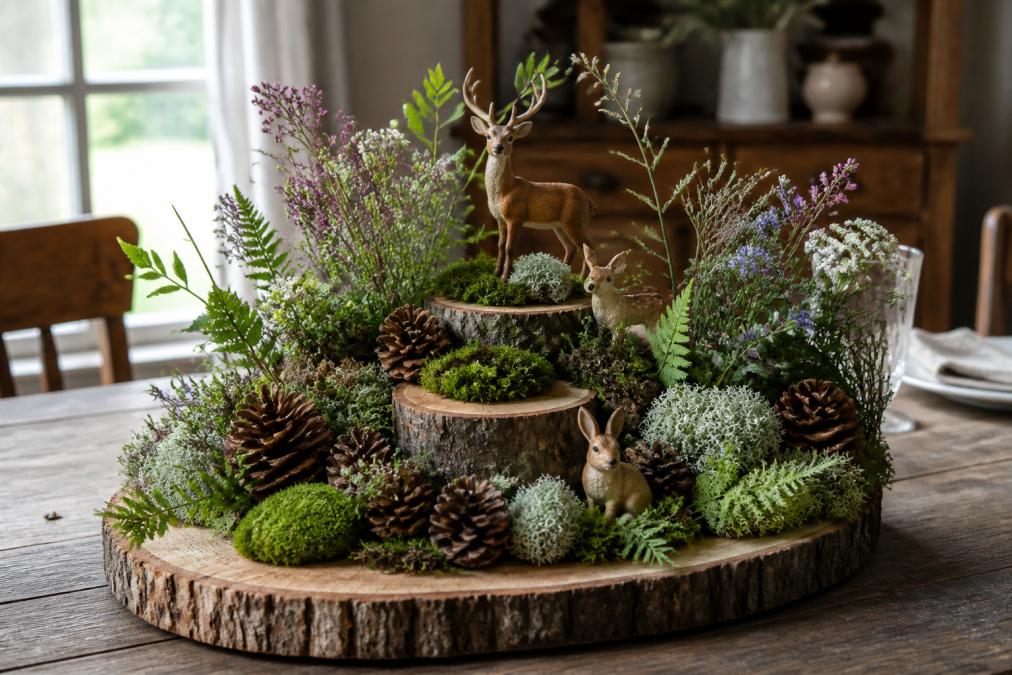
Creating rustic woodland centerpieces for events brings the forest indoors, layering natural textures and earthy tones into arrangements that feel both curated and organic. Whether you're styling a wedding reception, dinner party, or seasonal gathering, rustic woodland centerpieces transform tables into intimate woodland scenes. This guide walks you through sourcing materials, building stable bases, and assembling centerpieces that look beautiful from every angle.
What You'll Need: Essential Materials for Woodland Centerpieces
Building a rustic woodland centerpiece starts with understanding which materials anchor the design and which ones add detail. The foundation determines stability; the layers determine visual interest.
Natural Elements and Greenery
Moss forms the backbone of most woodland arrangements. Sheet moss creates clean surfaces; sphagnum moss adds volume.
Greenery choices matter for both aesthetics and longevity:
- Eucalyptus, silvery-green, lasts 2-3 weeks without water
- Ferns, soft, feathery texture; prefer humid conditions
- Ivy and trailing vines, create movement and softness
- Preserved leaves, oak, maple, and beech in warm autumn tones
- Cedar and evergreen branches, aromatic, hold shape well
Foraged wildflowers, dried grasses, seed heads, and flowering branches introduce height and color. Stick to muted creams, blush tones, and soft yellows rather than bright florals.
Structural Components and Bases
Wood forms the visual anchor. Slice branches into 1-2 inch cross-sections; birch and oak offer pale tones, walnut and hickory create contrast. Leave bark intact for rustic appeal or strip for a cleaner look.
Stump cross-sections (4-6 inches diameter) provide stable bases for moss, figurines, and arrangements. Drill a shallow depression in the center to anchor tall elements if needed.
Pine cones, twigs, and fallen branches create layered texture. Collect varied sizes, large cones anchor the arrangement, smaller ones fill gaps.
Woodland Creatures and Figurines
Small woodland figurines, foxes, owls, deer, rabbits, hedgehogs, add narrative. Simple ceramic or wooden pieces in muted earth tones work best. Position them as if exploring the landscape rather than sitting formally.

Birds, butterflies, and insects (real or ceramic) create depth. Tuck them among branches so they're discovered rather than immediately obvious.
How to Arrange Moss and Wood Centerpieces
The arrangement process builds from base to detail. Each layer should feel intentional but never forced, woodland scenes are inherently asymmetrical.
Building Your Base and Foundation
Start with a stable foundation. Place the base on a flat surface and test for wobbling; sand rough edges so it sits evenly.
Layer sheet moss over the wood surface, securing it with floral pins or nails if the surface will be moved. Build up moss in some areas to create topography, higher mounds and lower valleys suggest terrain.
For shallow bowls or trays, create a 1-2 inch moss bed that anchors stems and adds texture.
Position tallest elements first, branches, grasses, or flowering stems. Lean them slightly rather than standing upright; natural growth rarely follows perfect verticals.
Layering Texture and Creating Visual Depth
Work from background to foreground. Place larger elements in the back, mid-sized pieces in the middle, and smallest details forward.
Vary textures deliberately: soft moss against rough bark, feathery ferns next to solid wood, smooth stones with spiky grasses.
Color should progress subtly. Introduce warmer tones (rust, bronze, cream) as you move forward; avoid clustering all color in one spot.
Negative space matters as much as filled space. Leave some moss visible. Don't pack every gap. Breathing room makes the arrangement feel curated rather than crowded.
Balancing Height and Scale
Keep heights to 12-18 inches maximum for dining tables so guests can see across. The arrangement should be viewable from all sides.
The tallest element should be roughly 1.5 times the base width. A 6-inch-wide arrangement works with a 9-inch-tall focal branch.
Balance visual weight around the arrangement. If one side has a tall branch, balance it with a cluster of pine cones or figurines on the opposite side, asymmetrical balance feels more natural.
Creating Rustic Woodland Centerpieces with Lighting
Lighting transforms a centerpiece from daytime decoration into evening focal point. Soft, warm light suits woodland aesthetics better than bright white.
Choosing the Right Light Sources
Fairy lights (warm white, 2700K) are traditional. Drape them through branches or weave into moss. Battery-operated lights avoid cord clutter and heat.
Candles, tea lights, votives, or tapers in glass holders cast flickering light that mimics firelight. Nest them in moss or position to backlight foliage. Use unscented candles.
LED string lights offer consistent brightness without heat; choose dimmable options if the venue allows.
Avoid bright white or blue-toned lights. They flatten the warm, earthy palette that makes woodland arrangements work.
Safety Considerations for Ambient Lighting
Never place open flames directly in dried moss or against wood. Keep candles at least 6 inches from any combustible material.
Battery-operated lights generate minimal heat. Still, avoid placing them in contact with delicate flowers or leaves for extended periods.
Check venue fire codes before using open flames. Many spaces prohibit candles or require specific holders.
DIY Woodland Wedding Decor Ideas and Budget Sourcing
Rustic woodland centerpieces scale to fit budget and venue. A single arrangement anchors a sweetheart table; multiples create continuity across a dining room.
Fox Indoor Faux Suede Pillow | Woodland →
Seasonal Variations and Color Palettes
Spring centers on fresh greens and pale blossoms. Use bright moss, new fern fronds, cherry blossoms, and pussy willow with soft pastels used sparingly.
Summer brings fuller foliage and wildflower abundance. Incorporate hydrangeas, Queen Anne's lace, and grasses with sage green and cream accents.
Fall is the most forgiving season for woodland aesthetics. Rust, bronze, deep gold, and burgundy dominate naturally. Dried leaves, wheat stalks, seedpods, and darker wood tones ground the palette.
Winter calls for evergreens, bare branches, and cool-toned moss. White-painted twigs, frosted elements, and silver-gray stones suggest frost. Cranberries or deep red berries add subtle color.
The most cohesive arrangements stick to a 3-4 color palette. Earthy, muted choices work better than bright or saturated colors.
Finding and Sourcing Materials Responsibly
Foraged materials reduce costs and add authenticity. Walk through local woods or parks after storms to collect fallen branches, shed bark, and natural debris.
Check local regulations before foraging on public land. Private land requires owner approval.
Nurseries and garden centers sell moss, branches, and foraged elements at higher prices than self-collection but with consistent quality.
Floral wholesalers offer bulk dried flowers, grasses, and preserved botanicals at lower per-unit costs.
Local craft stores carry figurines, floral supplies, and decorative items. Building relationships with staff often yields discounts for event projects.
Online sources work for specific elements but shipping costs add up quickly for heavy materials.
Structural Stability and Transport
A centerpiece that arrives intact is the difference between a polished event and a scrambled recovery. Stability must be engineered into the design.
Engineering Stability from Assembly
The foundation determines everything. A stump cross-section or wooden base must sit perfectly flat. Before securing materials, place the base on a level surface and check for wobbling. Sand the underside or shim with thin wood until it sits flush.
Moss adhesion is critical. Floral adhesive bonds moss to wood more reliably than pins alone. Apply adhesive in a grid pattern, press moss firmly into place, and allow 15-20 minutes to set before handling.
Tall elements need anchoring. Secure the base of tall stems using floral pins, wire, or nails driven at an angle. Test stability by gently pushing the stem sideways; if it shifts, add another anchor point lower down.
Weight distribution prevents tipping. Heavier elements should sit toward the center or low; lighter elements can extend outward or upward. Imagine the arrangement as a pyramid.
For shallow bowls or trays, create a stable internal structure using crumpled chicken wire or floral foam to anchor stems. Cover with moss so it's invisible.
Packing and Transport Logistics
Use sturdy boxes with walls at least 4 inches taller than the tallest element. Reinforce the bottom with packing tape.
Line the box bottom with 2-3 inches of packing material to absorb vibration. Place the arrangement in the center, not touching walls.
Fill voids completely with crumpled tissue, packing peanuts, or bubble wrap. The arrangement should not move when you gently shake the box.
Never place a heavy box on top of a centerpiece box.
On-Site Assembly and Final Adjustments
Transport arrangements partially assembled and complete final details at the venue. This reduces damage risk and allows adjustment to actual table lighting.
Contingency Planning
Bring a repair kit: extra adhesive, pins, wire, backup flowers and moss, scissors, and a spray bottle. Quick repairs prevent the arrangement from looking neglected.
Maintenance and Preservation During Your Event
Preserved and dried materials last indefinitely.
Mist moss lightly with water the morning of the event and once during the evening if the venue is warm or air-conditioned. Avoid heavy watering.
Common Mistakes to Avoid
Overcrowding is the most frequent misstep. Packing every gap makes arrangements feel cluttered rather than curated. Leave breathing room.
Frequently Asked Questions
What are the best natural materials for rustic woodland centerpieces?
Forest moss, wood slices and stumps, pine cones, twigs, bark, and foraged branches form the foundation. Layer in wildflowers, ferns, and dried grasses for texture. Small figurines of woodland creatures add character. Source responsibly by using fallen branches rather than cutting live plants.
How can I make budget-friendly rustic woodland centerpieces?
Forage for free materials like branches, moss, and pine cones from your own yard or local parks. Use inexpensive vessels such as mason jars or wooden stumps as bases. Skip expensive florals and focus on greenery and natural texture. Thrift stores often carry affordable woodland figurines. DIY wooden bases from scrap wood or tree stumps cost nothing if you have access to a saw.
How do I preserve moss and branches so they last through my event?
Keep moss misted lightly but not waterlogged. Branches and wood naturally resist deterioration over a few hours or days. If your event spans multiple days, mist greenery lightly each morning and store centerpieces in a cool space overnight. Avoid direct sunlight, which dries delicate elements quickly.
What lighting works best with rustic woodland centerpieces?
Fairy lights and candleholders create an enchanted, ambient glow that complements earthy tones. Battery-operated LED lights offer safety without open flames. Position lights low within the arrangement to cast shadows and highlight texture. Avoid harsh overhead lighting, which washes out the woodland aesthetic. For outdoor events, check local fire codes regarding candles and open flames before your event.